2.1.4.8.6.2. Accrual Process
-
TimberScan has an accrual feature that lists all unapproved invoices and allows you to select the invoices that you wish to accrue.
-
The system will create a month-end accrual journal entry and an auto reversing journal for the first of the new month.
-
For Job Cost transactions it will create the journal entry in Job Cost.
-
For overhead or property management transaction it will create a journal entry in the General Ledger.
NOTE: It is highly recommended to print the Unaccruable Distributions report before running the accrual process. This report displays distributions which will not accrue, such as recurring invoices or invoices uploaded from AP.
Please follow these steps to properly accrue the necessary invoices, as well as close and set the new Accounting Periods within TimberScan.
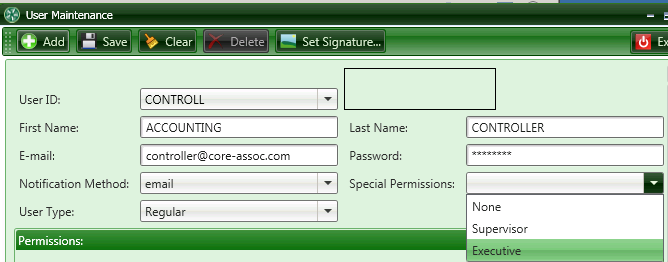
1) Login to the TimberScan system as a user who can create the Accruals, Special Permissions set to (supervisor or executive).
2) Select Utilities > Accrue Invoices.

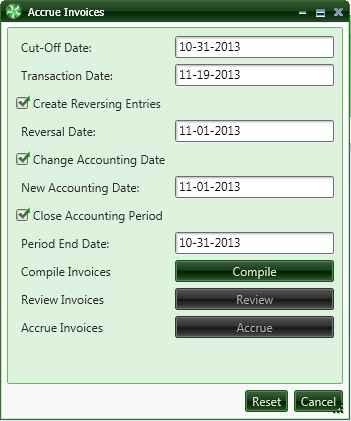
3) Once the ‘Accrue Invoices’ is selected, the user will see the following screen. Within this screen, the user will need to identify a number of dates. Please see the screen shot below along with the reference points directly below for complete description of each date that is necessary for Accruing Invoices.
-
Cut-Off Date: The Cut-Off date will usually be the last day of the month you are accruing.
-
Transaction Date: The Transaction Date will be the date assigned to the accrual transaction that is being built with this process.
-
Reversal Date: The Reversal Date is the date the accrual reversal will be dated within Sage 300 CRE. This should always be set to the first day of the next month, unless otherwise defined.
-
Change Accounting Date - New Accounting Date: The New Accounting Date is the date that will be applied to all non-approved invoices that are being accrued. Thus, moving their accounting date will allow them to be processed (approved for payment) in the next accounting period or if needed, accrued again. NOTE: There is a separate step for this process if you would rather do it separately.
-
Close Accounting Period - Period End Date: This should always be the last physical day of the month that is being closed. Setting this date to the last day of the month will prevent anyone from accidently keying into an Accounting Date that is no longer available for use. This will force the user inputting invoices to use the new Accounting Period, thus allowing for new invoices to process forward smoothly.
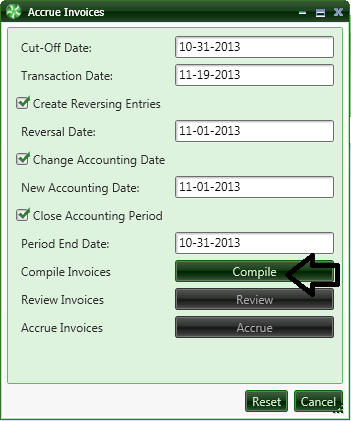
4) When the dates have been defined, the Accrual user should now select the ‘Compile’ button. This will compile the list of invoices that are available for the accrual process. When this is complete, the system will allow the ‘Review’ button to be selected.
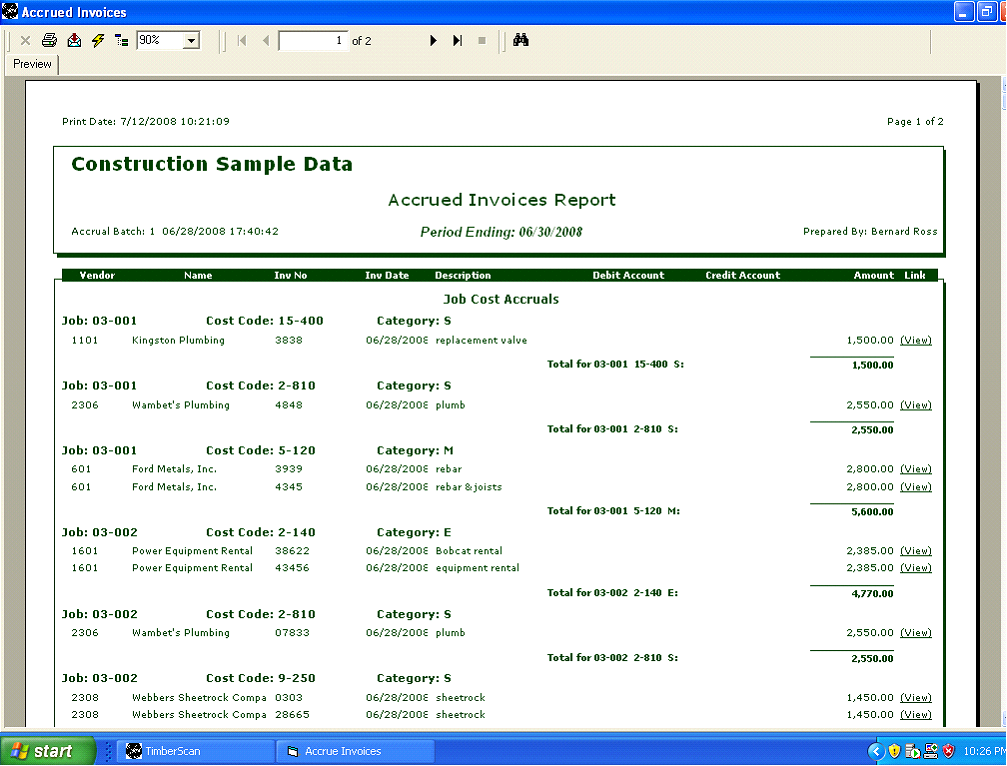
5) After the ‘Compile’ function has completed, select the ‘Review’ button to see all possible invoices that can be potentially accrued. The screenshot below is for illustration purposes only.
Please note that when the ‘Review’ option was selected the list of invoices available for accrual is automatically displayed, with all having the check box to the far left selected.
If the Accrual user sees an invoice(s) that does not need to be accrued, the user deselects that invoice(s) by clicking the check box thus removing the check mark. You can also unselect them all and select invoices one by one.
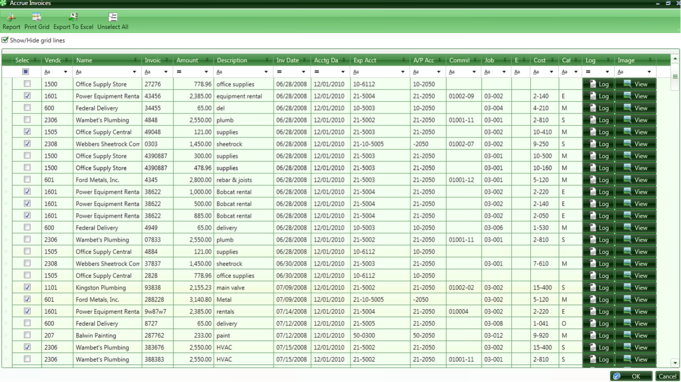
Note: It is a good idea to print this report or export it to Excel to be able to confirm the amounts and accounts in Timberline.
6) If all the necessary invoices have been identified and have the appropriate check mark, the user can select ‘OK’ to continue with the accrual process.
7) The user will be returned to the Accrue Invoices screen (see screenshot below)
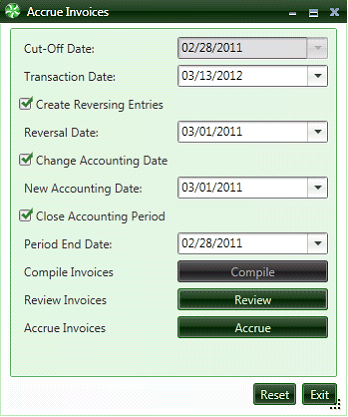
8) If the user is satisfied that the dates and invoices to accrue are accurate, the Accrual user can now select the ‘Accrue’ button to finalize the Accrual process within TimberScan.
When selecting the ‘Accrue’ button, the user will be prompted to save the accrual file.
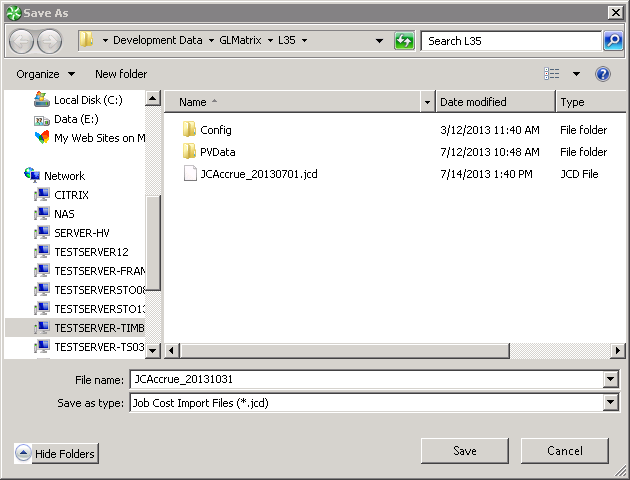
The Accrual file should be named automatically by the system. Please do not change the file name being used when saving, unless absolutely necessary. Please be sure to save this file to the appropriate location on the Sage 300 CRE server as you will need to access this file and import it into the Sage 300 CRE Job Cost module to complete the Accrual process.
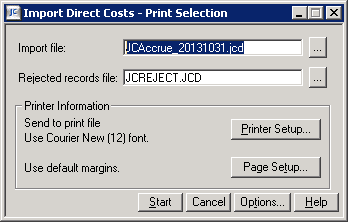
9) Once the file has been saved, open the Sage 300 CRE Job Cost module and then go to the Tools > Import Direct Costs.
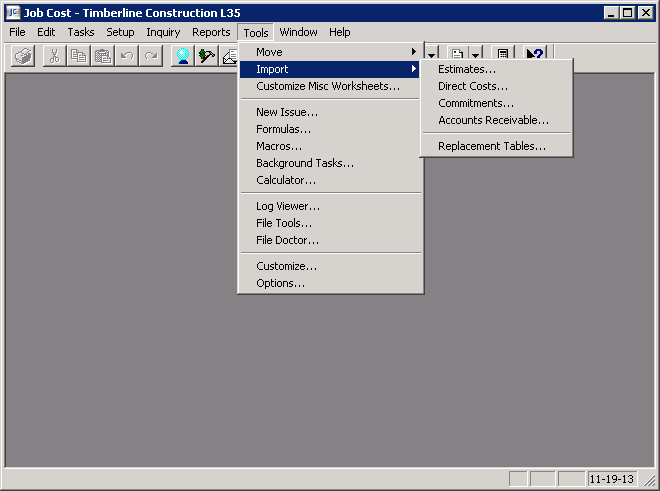
When prompted, access the file saved during step 8 above and import.
PLEASE NOTE: If there are any GL Accruals, they will import as part of the Job Cost import. However, you will have to post those entries in GL.