2.8.3.4. Troubleshooting Tips for Capture
1) The template is not setup or recognized.
2) A coding profile is not found
3) The invoice already exists (duplicate invoice)
ADDITIONAL TROUBLESHOOTING TIPS
1) When creating a template and the result does not read the field, click on the anchor tab and see if that field is highlighted in green. If that field is black, OCR will not read it. However, while it might be in black on that sample invoice, it may be read when processed because of the PDF text layer.
2) If invoices are successfully routed to data entry but no fields are coded, try selecting different anchors for that template.
3) When selecting anchors, try not to select something with too many dashes, or an area near logos, handwriting or graphics.
4) Make sure that the anchors you select are unique for that vendor. If your invoice is accessing the wrong template, go back and change your anchors. The anchor you selected is one that appears on multiple templates. You want to select one that is unique for that vendor. Generally vendor name or address or phone numbers or web address work best.
5) You do not need to use new unprocessed invoices to create your templates. You can use any invoices from that same vendor as long as it is in the same format (either .pdf or .tiff) as the sample that was used to create the template. However, to test the results of the template, you will need to Acquire a new invoice.
6) Make sure your sample is typical for that vendor. If a vendor has multiple invoice formats, you can create multiple templates for that vendor. However you will need to find and select unique anchors for the different templates.
7) If Capture is consistently not reading a field, select the item in a different location for the template. For example, amount due might appear in several areas on the sample. If the amount due in the body is floating or not able to be read, use the one on the payment stub.
8) If the other fields are not read, then compare the highlighting on the image screen with what is actually coded to see where it might be off. You might need to tweak the range in the template
9) If you find that all the invoices for that vendor are off in exactly the same way (for example, the highlighted fields are lower or higher than the actual fields), then you might need to go back to the template and reload a different sample invoice. You would not need to recreate the template but just need to process the new sample and select all the fields again.
10) Sometimes when you normally will receive an invoice for a vendor where job ID is indicated but on the sample, it is blank, put the highlighting in that field anyway. You don't have to skip as you can still select the next item at the top of the menu. If you do not need the field, move the highlighter to a blank area and click 'Skip'.
11) If you have leading zeros in invoice number and you did not check remove leading zeros (in admin > Settings > Systems Settings>Capture settings), uncheck the Remove Spaces box on the top of the create Capture screen otherwise Capture will drop off leading zero in invoice number.
12) If you have a hyphen or dash in invoice number, Capture will not pick up that hyphen or dash. Uncheck Remove Spaces will leave a space in the invoice number where the hyphen/dash normally appears.
13) Make sure that your highlighting range is wide enough to accommodate larger numbers or amounts otherwise amounts will be truncated. However, if the highlighting range is too large, OCR can pick up values close to the box. So if there are values adjoining the field, make the range as tight as possible even if it appears to truncate the field.
14) If the fields in the invoice are very close together and tight, zoom in to give a little more control in selecting. Remember to make sure highlighting does not extend outside the field on top or bottom otherwise pdf text layering might pick up the adjoining fields.
15) When creating a template, if you initially skipped a field and want to go back to select something for that field, make sure to click continue on the bottom of the screen. Then in Review, you should be able to see the new field in the summary.
16) If certain fields are not OCR readable, try clicking on the Deskew button. This feature is available beginning with version 3.8.3.45. This should optimize the document. Now see if the field is readable and highlighted in green. If it is not, you can reload the original.
17) If you are working with a standard form, either AIA or a form created by your company that every vendor needs to submit, create one template for that form with multiple profiles for the different vendors.
18) Try logging into another workstation and test the template. Sometimes, the issue might be on your workstation.
19) When need to create multiple profiles, first create template for single profile. Once you test and template works, then add the additional profiles.
NOTES:
Any TimberScan user who has the ‘Acquire Invoices’ permission can also acquire Capture invoices. However, ONLY a licensed Capture user can process Capture invoices.
Templates are created by data folder. While templates may be copied from one data folder to another, the invoice coding on the template may need to be modified.
If the invoices in the pdf are all an equal number of pages, you can select the middle option to separate the invoice into X number of pages
If the invoices in the pdf have variable number of pages, you need to separate them manually
In the Acquire process, you can drag and drop a page within an invoice that has been separated but you cannot drag and drop a page from 1 invoice to another nor delete a page.
The reason for this is that when you Acquire the invoice, you are separating the pages on the Tiff file in the TimberScan Acquire screen. While TimberScan is able to “mark” the pages as new invoices on the pdf as you are doing that in the Acquire screen, what can’t be done is pages that you might move on the Tiff file cannot be moved in the same way in the original PDF. If you do that, the way the pages are now displayed in TimberScan Acquire would not be in the same order as the PDF, therefore when Capture is reading the PDF text layer from the original PDF, it would not be looking at the same page that was moved on the Tiff. The same is true that if you delete a page in the Acquire process, that page is not removed from the original pdf. If a page needs to be removed, it can be done in the Invoice Entry Screen.
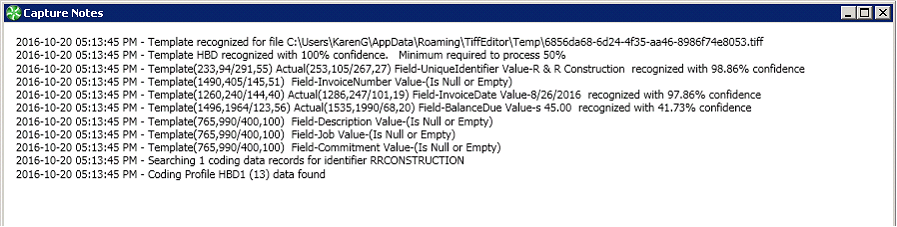
One very important diagnostic tool in understanding the success or failure of template/coding recognition is the Capture log. Capture logs are located in the client’s LogFiles folder and appear as follows: Files start with the user login ID followed by a “.” and the word OCR. Pressing F8 from the data entry grid for a captured invoice will display the log as well. Any time Capture does not return the expected results, the first step is to look at the Capture log file for that user’s session.
Many times the log will give insight into something specific within the scanned document and allow you to work on tweaking the template. For instance, if the job is not recognized you may decide to pull the job from a different location on the invoice or hard code it in the coding profile. It will also yield further visibility into the recognition process.
It is also important that the Capture log be attached to any Capture cases you create on the customer portal.