Similar to Email Monitoring, Acquire Automation (or Auto Acquire) is an add-on product (available at no additional cost providing you are current on a support agreement) that works with Email Monitoring. Acquire Automation takes Email Monitoring a step further by cutting out the acquire step - invoices stripped from emails are automatically sent to the designated data entry group(s). Basically, you set up vendor definitions that identify the vendor's email address (from) and the address where they are sending their invoices and attachments (to). By defining this for each vendor, invoices can be automatically acquired into the appropriate data folder or specific data entry group.
If you have multiple company data folders or different offices that enter their own invoices, it is suggested that you establish a different email address for each company data folder or office entry group. See Examples and Recommendations below. Each vendor definition must have a unique combination of sender & receiver email addresses, where typically the receiver address is linked to a specific data folder or data entry group. Acquire Automation knows what company data folder to save the invoice to, based on the sender’s and/or receiver's email address.
If you are already using Email Monitoring, you will need a new license key to activate Acquire Automation. In addition, vendor definitions need to be established. If you have not implemented Email Monitoring, after you complete a required checklist, AvidXchange's technical support team will schedule a time to install and configure the service in conjunction with your IT staff. This is a separate installation from TimberScan and may be billable.
After Acquire Automation has been installed and configured, a new menu option - Emailed Invoices - will now appear on the Acquire ribbon. If you are upgrading from Email Monitoring, you already have this option.
Setup:
The Acquired Email Definitions button is for Acquire Automation only. While the installation and configuration for Acquire Automation is handled by our technical support team, there is additional setup in TimberScan admin that is required. You must set up Email Definitions for each vendor emailing invoices.
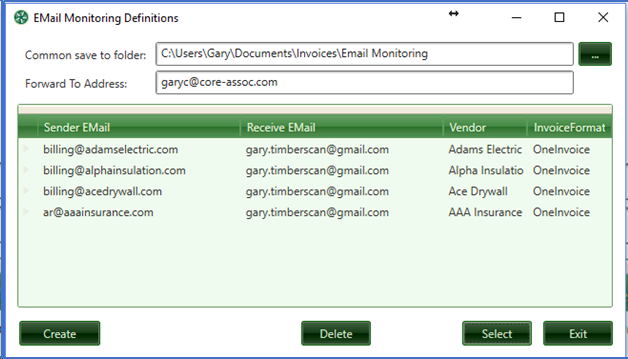
1. Open Acquired Email Definitions.
2. Complete the following fields:
-
Common save to folder: Select a default folder for saving emailed invoices. This is reserved for invoices that have an issue auto acquiring or for invoices that will be acquired by Capture.
-
Forward To Address: Enter an email address for forwarding emails based on options outlined below.
3. Select the Create button to open the Aquired Email Definitions window. A definition is required for each vendor, or when there are multiple email addresses for a single vendor, or for each address the vendor uses for sending invoices.
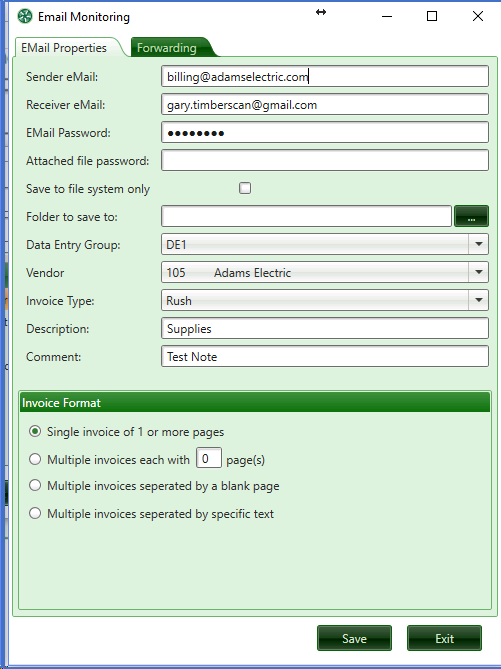
Email Properties Tab
Complete the following information:
-
Sender email: Enter the email address the vendor is emailing the invoices from.
-
Receiver email – Enter the email address the vendor is emailing the invoices to. If you have multiple data folders, enter a unique receiver email address per company data folder that the vendor is using to email invoices. See Examples and Recommendations below.
-
Email Password – Enter the password of the email account where the vendor is emailing invoices (receiver email account).
-
Attached File Password – Enter the password, if applicable, in your email system to allow Acquire Automation to access and open the emailed invoices.
-
Folder to save to – When "Save to file system only" is checked, enter the path where the invoice files will be saved in the event that Acquire Automation cannot acquire the invoice. This could be due to an error or if the invoice is to be acquired via Capture. It is also used when you do not want invoices from this vendor's address to be acquired automatically.
-
Data entry group – Select the data entry group where the invoices should be placed after auto acquired.
-
Vendor – Select the vendor.
-
Invoice code/type – Select the appropriate invoice type, if applicable, for this vendor.
-
Description – Enter a description that will populate the description field on the invoice, if applicable.
-
Comment – Enter an optional comment regarding this vendor’s definition setup, if applicable. This does not create an annotation or comment on the vendors’ invoices.
-
Invoice format section – Select the appropriate option based on whether the vendor sends a pdf per invoice or if there are multiple invoices in one pdf. If you select 'Multiple invoices separated by specific text," you will be prompted to select the text location and to enter the text to denote multi-page invoices.
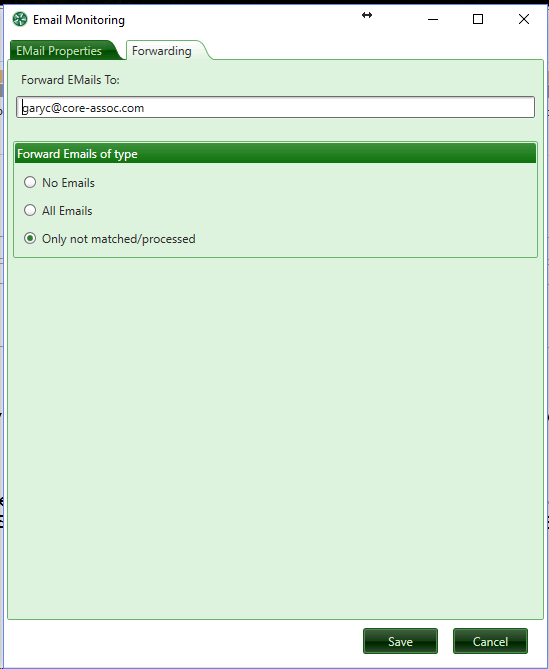
Forwarding Tab - Select this tab to enter an email address to forward the emails after the attached invoices are acquired. You can then select what type of emails to forward to this address:
· No emails
· All emails
· Only not matched/processed – to forward emails that encounter an issue in auto acquiring, such as emails with no attachment, or when the email attachment is a file type other than pdf or tiff.
Be sure to SAVE your entries. As you save each vendor’s definition, the window will remain open and common items will remain pre-filled, therefore you only need to enter the next vendor’s Sender’s Email Address & the vendor Name/ID. If any other fields need to be changed, they can be edited.
NOTE: We are not currently defining supporting documents for Acquire Automation. If supporting documentss are emailed with the invoice, Acquire Automation will not be able to separate them from invoices into two different document types.
EXAMPLES AND RECOMMENDATIONS:
· Multiple Data folders – Set up different email accounts with vendors so they can invoice the appropriate company data folder. We suggest a separate email address to send invoices to per company data folder.
· Multiple offices doing their own entry – Establish different email accounts with the vendor so they can invoice the appropriate office. We suggest a separate email address to send invoices to per office.
· Different data entry groups based on certain vendors – You can assign the appropriate vendors to the data entry group who enters those vendor’s invoices.