TODO: Change the footer's content in Project Settings : HTML (CHM) Export : Setup HTML Template and Layout
2.1.2. TimberScan Buttons, Symbols and Shortcut Keys
This section explains special symbols and buttons in Timberscan as well as shortcut keys.
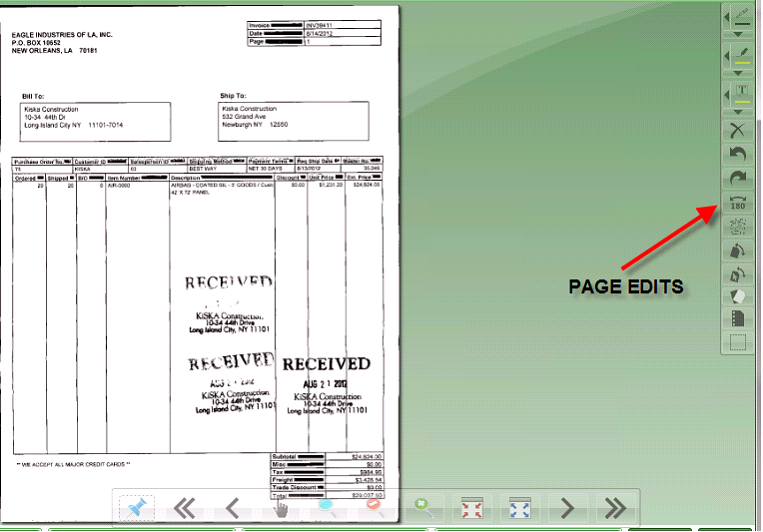
Page Edits – Use Page Edits to rotate or straighten an image (among other features) as well as add annotations. Page Edits are usually located on the right side of your display screen:
Page Edit Symbols
Add pen notation
Highlight
Add a “Sticky Note” to the image
Add Signature
Delete all annotations
Rotate image left 90 degrees
Rotate image right 90 degrees
Rotate image 180 degrees
Despeckle – sharpen – the image
Auto deskew or straighten image
Manual deskew
To black to white – turn image positive or negative
Remove holes – can only be applied to black & white (not color) images
Remove border
Acquire Buttons
The following buttons are available at the top of the Acquire screen:
Acquire Symbols
Remove the current image page highlighted
Remove all pages displaying in the Acquire screen (If you accidently brought in the wrong file you can delete the entire batch from Timberscan here.)
Remove all markers made (to start over); can be used to remove checks and supporting documents, not just invoices
Move to the previous or next image
Start a new invoice with the selected image
Floating Taskbar - The floating taskbar is available throughout Timberscan. Use it to navigate through multiple image pages. A description of each icon appears when hovering the mouse over it.
Taskbar Symbols
Pin the taskbar to your screen (to disable auto-hide)
Move to the first page
Move to the previous page
Pan mode
Zoom mode (in small, defined increments)
Zoom out
Zoom in
Resize image to fit window
View image at original size (super size)
Next Page
Last Page
Invoice Entry Buttons – Most of the same buttons display in Invoice Entry, Approve and Final Review. Some buttons will/will not display depending on the user’s security.
The following buttons are available at the top of the screen:
Invoice Entry/Approve/Final Review Symbols
Move to the previous or next invoice
View the invoice in full screen mode (without data entry grid)
Remove a page of an invoice
Look up job history (in Timberscan and Sage 300 CRE)
Place an invoice on hold (limited by security)
Print the invoice
In Invoice Entry, route the invoice to a different company data folder or to a different data entry group; in Approval, route the invoice to a different approver; in Final Review, route to a different Final Review group
Attach an additional image to the invoice (backup such as a packing slip, etc.)
Add an internal note to the invoice that automatically pops up throughout the approval process
View invoice notes or the invoice log
Allocate Expense - This button is available when the cursor is in the distribution grid on an invoice when an expense allocation (set up in Sage Accounts Payable) is set up for a , a new window opens for the operator to select an allocation expense from the list in
View metadata pertaining to the invoice
Select to maintain the size of the image in this and future entry sessions
Select to display thumbnail images of the invoice on the left side window
The following buttons are available at the bottom of the Invoice Entry screen:
Invoice Entry Symbols
Add a joint vendor to the invoice
Display a list
Calculate a tax percentage or tax amount (only available in a tax field)
Use a calculator (only available in a numeric field)
Display line items on a commitment
Cancel & remove all distribution lines
Change the invoice type
Delete the selected distribution line
Mark a distribution 1099-exempt
Display a list of coded supporting documents matching coded information
Mark the invoice as “unapproved” in Sage 300 CRE Accounts Payable
Display vendor history (in Timberscan and Sage 300 CRE)
Email the invoice
Delete the invoice – the invoice will be deleted and stored in the Deleted Invoice Inquiry. From there, the image can be retrieved and re-acquired if desired. The invoice header information (no distribution data) is saved.
Reject invoice; a pop-up screen displays possible levels as well as personnel who should receive the rejected invoice - only individuals who have processed the invoice will be displayed as choices
In Invoice Entry, accept the invoice before it can be processed
In Approve, approve the invoice to process it forward in the routing course
In Final Review, queue the invoice to send it to the export queue for export to Accounts Payable
Leave Invoice Entry or Approval and process all accepted/approved invoices
Move to the previous or next invoice
TIMBERSCAN SHORTCUT KEYS
To enable underscore for shortcut keys, hit the [Alt] key on the workstation keyboard first. An underscore will display beneath the shortcut letter.