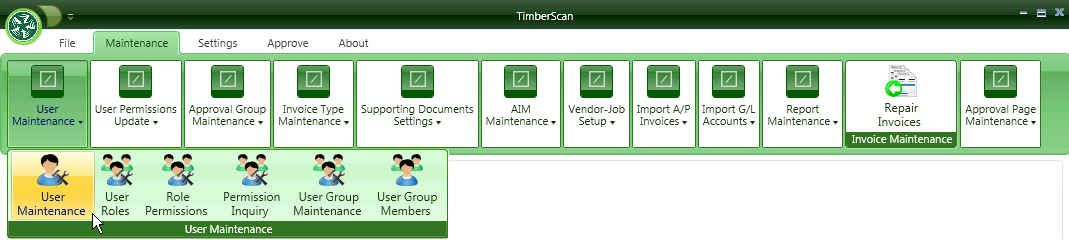
2.1.3.1.4. User Maintenance
To set up a new user, open User Maintenance > User Maintenance.You should have roles set up before setting up new users. A role is a required field.
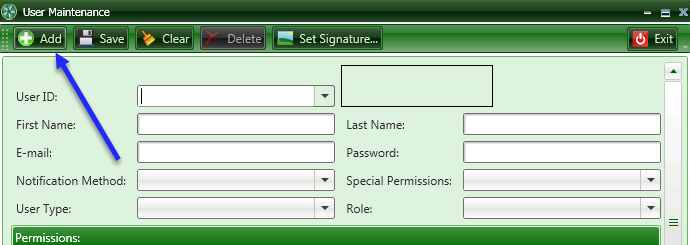
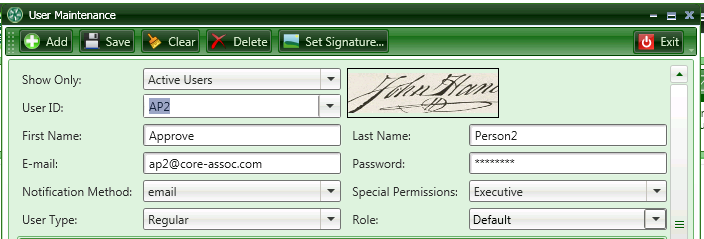
Select the ADD button. All the fields will turn white.
User ID: Enter a USER ID for the user (8 characters max). This can be the same as the user's Sage 300 CRE user ID but this naming convention is not required.
NOTE: TimberScan users do not have to be set up as users in Sage 300 CRE, however, they must have Sage 300 CRE installed on their workstations for TimberScan to function.
First Name: Enter the user's first name, up to 15 characters.
Last Name: Enter the user's last name, up to 20 characters.
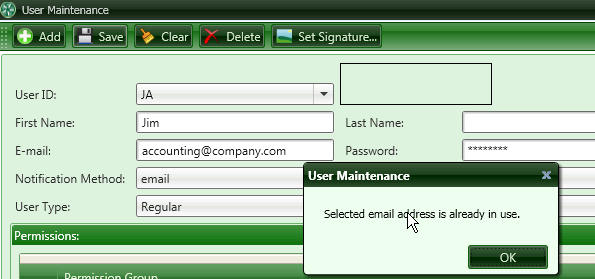
Email: Enter the user's email address. This can be used for notifications to TimberScan users when they have invoices that need approval, etc.
NOTE: With the release of TimberScan's Mobile application, following changes apply to email addresses:
· If a user is not a mobile user, no email address is required.
· If a user is a mobile user, you must enter a unique email address.
· If an existing user’s record needs to be edited in any way AND there is an email address present, that email address must be unique in order to save the record.
A new user with an invalid email address will not be saved in User Maintenance.
Password: Enter a password for the user. Passwords must be 6-8 characters in length; they do not need to be the same as a user's Sage 300 CRE password. Each password should contain at least 1 letter, 1 number and 1 special symbol.
NOTE: You may also enter "Password" here and the user will be prompted to change his or her password when they first log in.
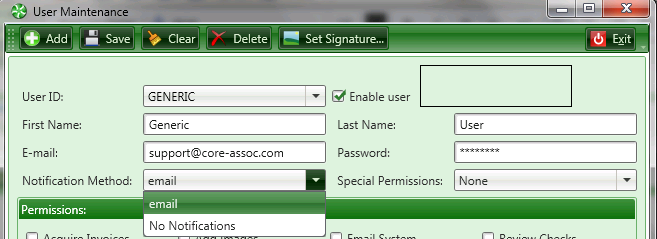
Notification Method: Select a method for the user to be notified when he or she has new invoices to enter, approve or review. There are two options to choose from: (1) "email" or "No Notifications".
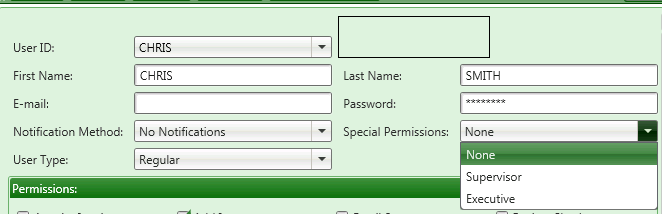
Special Permissions:
-
None is the default. Most users will not need special permissions. All of their daily tasks can be assigned using the regular permissions settings (see below).
Supervisor: Has access to the Utilities menu and Deleted Invoices Inquiry. Users with "Supervisor" permission will have access to invoices for all jobs and properties if they are also given "View All" (below in permissions). Supervisor and Executive permissions gives the user access to the Utilities Menu to process Accruals, Close Accounting Periods, Change Accounting Periods and Verify Export Batches.
Executive: Have access to all invoices with View All AND access to the Utilities menu and Deleted Invoices Inquiry as well as the ability to approve invoices for all approvers. In addition, they can override the approval routing system by completing the invoice approval process for an invoice.
For Example: An approval hierarchy has been set up with three levels of approval. An Executive user is approving on behalf of the first level approver and has specified that invoices are to be considered fully approved. Once he or she approves an invoice, it will bypass the next two approvers and go directly to Final Review or the Export Queue upon approval.
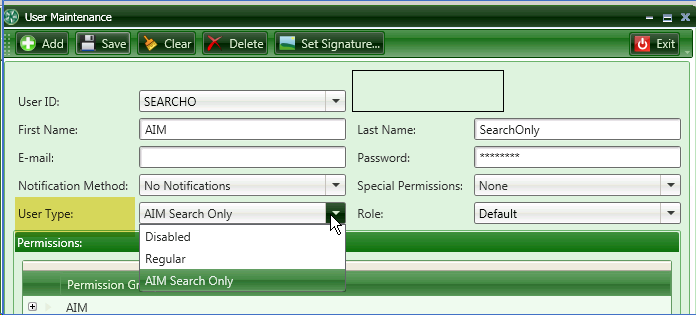
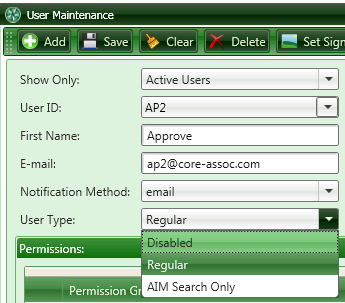
User Type:
There are three types of users from which to choose: Disabled, Regular or AIM Search Only. A Regular user has access to TimberScan and AIM permissions. Disabling a user frees up a license and decreases the number of User Accounts Enabled . The user can no longer log into TimberScan. Changing a user from disabled to regular increases the number of User Accounts Enabled. An AIM Search Only user does not affect the number of User Accounts Enabled. Starting with the 3.8.5 release, you can now have an unlimited number of AIM Search Only users. The AIM Search Only user can only log in and use AIM Search. These users are subject to AIM security in their searches.
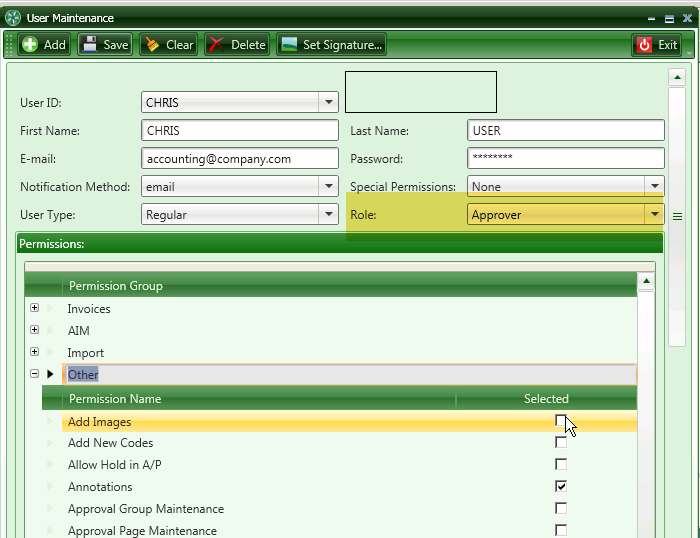
Role:
A role is required for a user. Select the appropriate role for this user from roles previously set up in Maintenance > User Roles. The role contains the permissions granted to the user. You can customize a user by modifying the permissions that migrate from the role by opening the Permission Group and checking or unchecking individual permissions.
NOTE: Existing users (prior to release 3.8.7.x) automatically migrate to a role labeled Default which contains all of the existing user permissions.
CAUTION: If you give a NEW user the Default role, that user gets ALL permissions checked automatically.
Select the Save button when you're ready to save your changes. Or select Clear to clear entries without saving.
The Delete button can be used after you've set up a new user and want to delete the record in order to reset up the user. The Delete button cannot be used to delete any users who have activity in the system. Users with historical activity can be disabled by setting the User Type to 'Disabled.'
Set Signature:
Number 28-11630
A user signature can be automatically added to the approval stamps created during TimberScan export. This same signature can be placed on an image using the signature annotation.
How to create and enter a signature on the operator record in User Maintenance:
• Sign a sheet in a box about 3 inches by 1 inch.
• Scan or save to a TIF or BMP file.
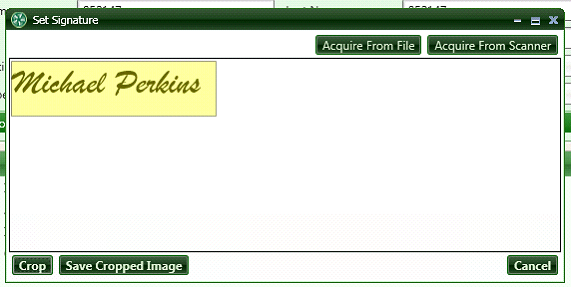
• Login as admin and navigate to User Maintenance. Retrieve the user ID and select [Set Signature]:
• A new window opens. Select the [Acquire from file] or [Acquire from Scanner] button and bring in the file with the signature.
• Select the [Crop] button and draw a box around the signature.
• Choose the [Save cropped image] button when done. The cropped signature displays in the upper right corner.
• Now select the [Save] button at the top of the User Maintenance screen.
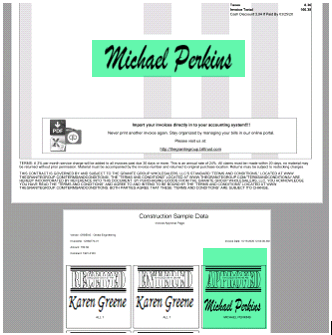
The signature is stored in the user record in the TimberScan SQL database. It is superimposed upon an image in TimberScan when a user adds the signature as an annotation and when the stamp is added to the approval page during export.
NOTE: Only TIF and BMP file types can be used as a signature.
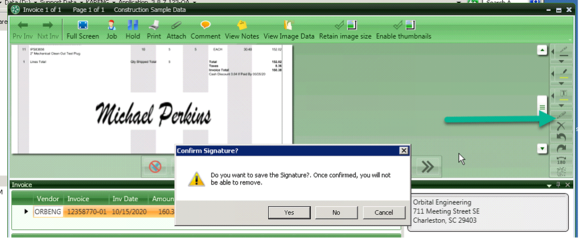
With the stored signature, a user can select the Add Signature annotation and add the signature to an image in TimberScan. Once saved, the signature cannot be removed:
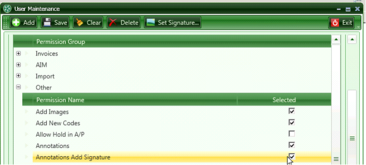
NOTE: To use the signature annotation, a user must have the Annotation Add Signature permission available in the Other permissions group in admin > User Maintenance:
After the invoice is exported, when a signature exists on the user record, the signature will automatically be saved on the approval stamp page in the Sage attachment. In addition, if the Add Signature annotation was saved, the signature will display on the image: